Continuing our goal of running an ASA server on Linux, we’ll add Code Server to our Docker stack. This will let us manage the INI files without using the command line. Here is the accompanying video: https://youtu.be/WvS0LonnrOE
In the last post we setup a Docker server on Contabo, installed Dockge to manage containers, and started an Ark: Survival Ascended server. Now we need an easy way to manage our INI files.
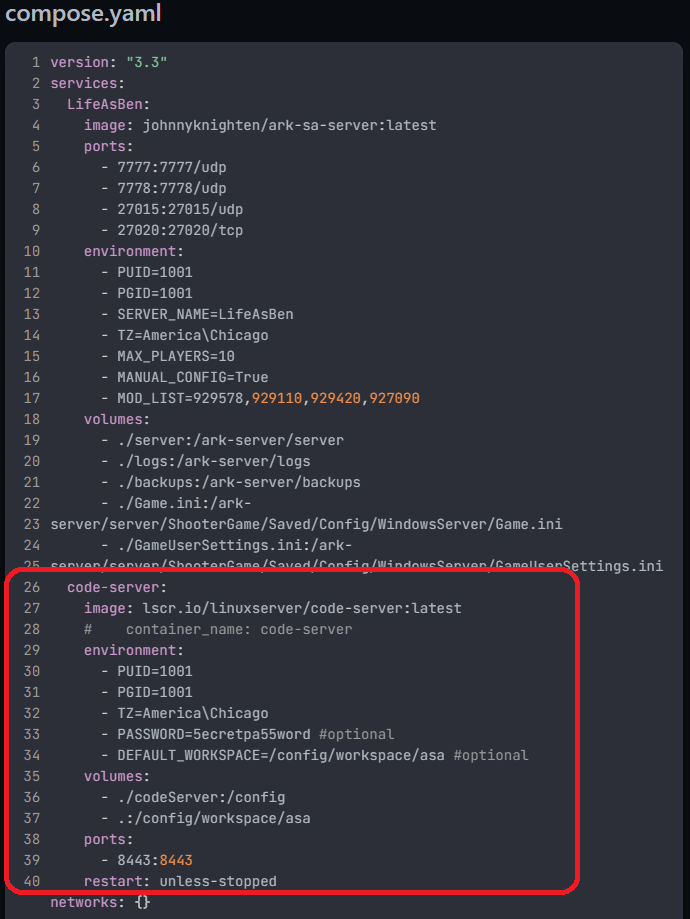
Add Code Server as a service to our Compose.yaml file
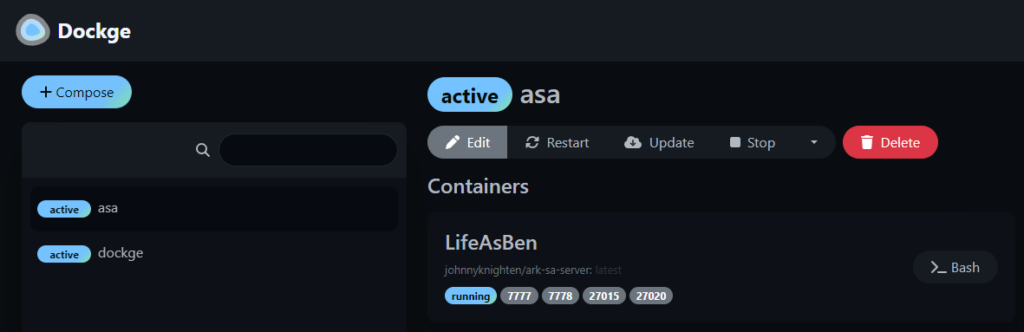
Inside Dockge, click the [Edit] button so we can modify our ASA stack:
In the code box on the right, we can then add another service for code-server. Make a couple lines before networks: {} and add in the new definition for our code server:
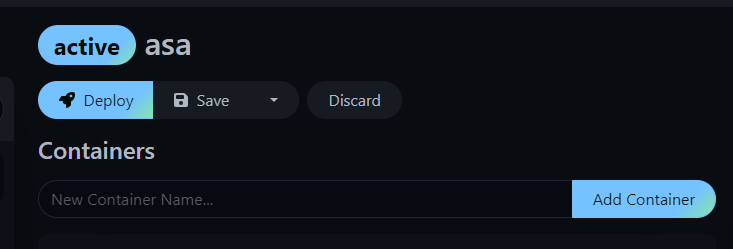
And that easy, we’re ready to create the new container! The previous [Edit] button at the top has turned to [Deploy], so we’ll click that:
Within a few seconds, you should have a Code Server container created! To access that, we’ll browse to it just like we did with Dockge, but using port 8443 instead: http://123.123.123.123:8443.
Managing INI files
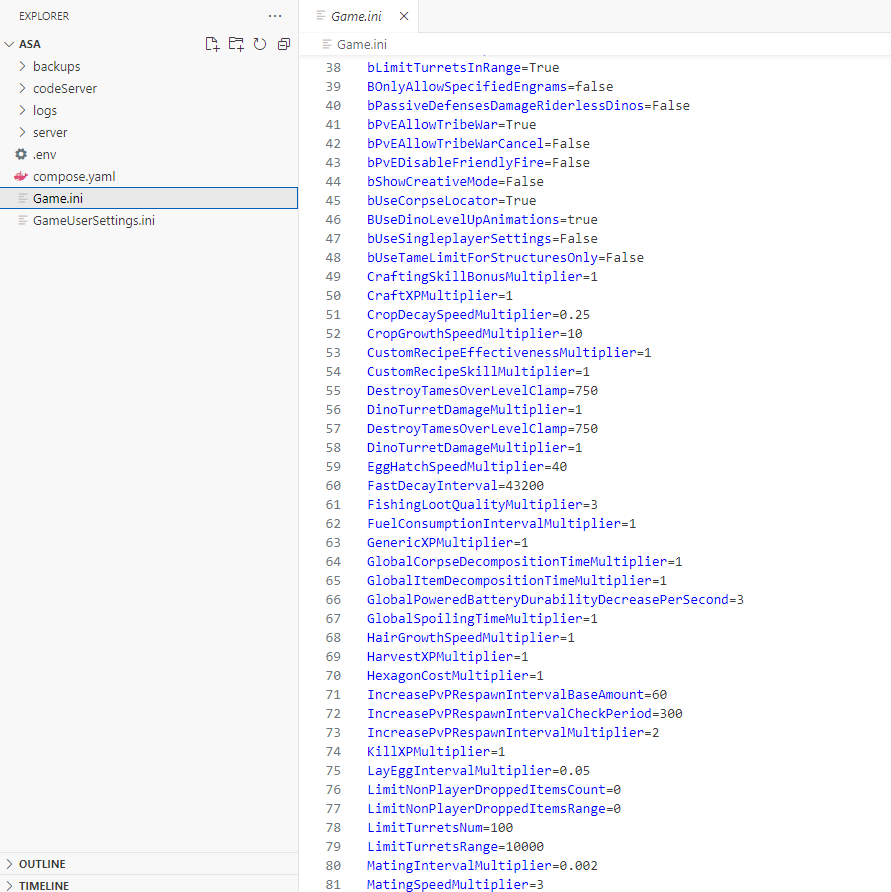
Once we’ve browsed to our new Code Server, we should be able to modify all text-based files in the workspace:
We mounted the default workspace to the root of our Docker stack folder, so we should be able to see all files for our server. Game.ini and GameUserSettings.ini are the two files we care about the most, but we could also download backups from this new screen! Here are some of my preferred settings for these INI files and a few others you may be interested in changing.
Some of these settings may be in the wrong locations. Some of options in my original GameUserSettings.ini were excluded here as I don’t think they matter. This should give a starting point though 😀
In 2023, Wildcard released Ark: Survival Ascended (ASA). This is the true successor to the Ark: Survival Evolved that we love! However, they partnered with Nitrado as the only “official” hosting provider. With enough complaints, Studio Wildcard chose to allow self-hosted servers – just as they had with Ark:SE.
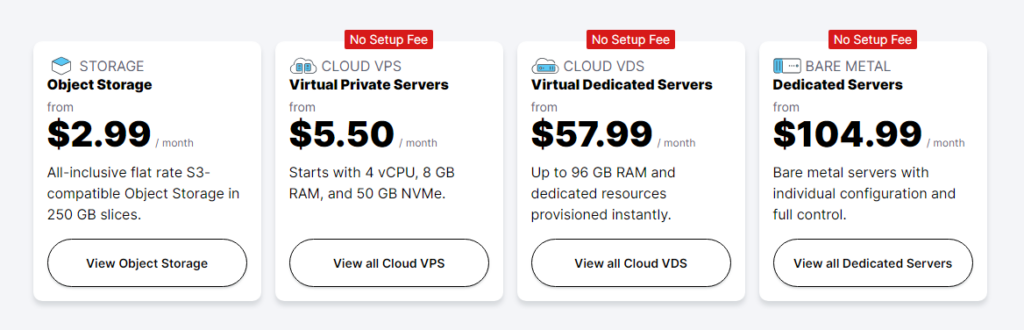
While not everybody has a spare machine lying around to host an Ark server, we can still rent decent Virtual Private Servers (VPS) from services like Hetzner or Contabo. After comparing the options, I settled on Contabo as the most affordable. It’s not perfect, but it’ll serve the purpose. Coming in around $15/mo USD for a server with 16GB RAM, it’s well below the Nitrado-hosted option – if we’re willing to put in the work to set everything up. So lets begin!
Choose a Contabo server
As of January 2024, Contabo has excellent price to performance options! If you just need a dev server, the $5.50 option is hard to beat with 4 V-cores and 8GB RAM.
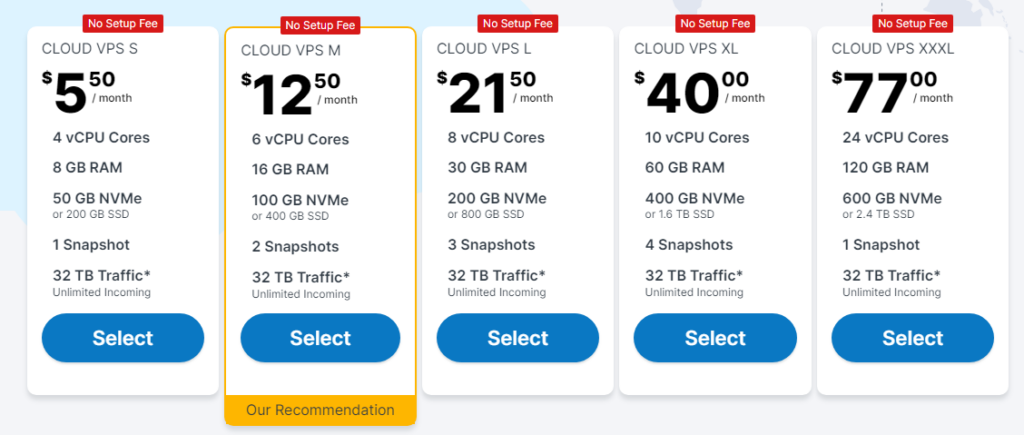
However, we’re needing slightly more than that to run an ASA server. The next step up will do nicely – though the price is a bit deceiving. We’ll explain why shortly. The “Cloud VPS M” with 16GB RAM is exactly what we need to host The Island on ASA. If you can pay in Euro instead of USD, you can save another 17%, but I don’t know if you have to pay a conversion rate above that.
Some things to be aware of in this price, though. The “No Setup Fee” is only if you’re buying 12 months up front. I find this very deceiving, though I suppose it’s probably fair. The actual setup fee is actually $8.50. Since it’s a 1-time fee and we’re still cheaper than Nitrado, it’s worth trying in my opinion. The $12.50 price is also misleading. To host in the US, I was charged an extra $2.65. East USA is an extra $3.60. I do understand that there could be extra cost depending on location, but I had already told the site I’m in the USA and paying with USD. That fee should have been included in the advertised price. Even with both hidden fees, we’re still cheaper than Nitrado 🙃
Configure your server
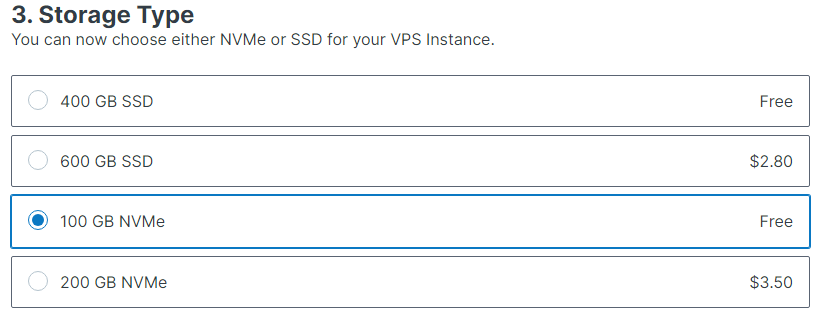
If you only plan to run an Ark server here, the 100GB NVMe is probably your best option. If you also want to host a blog with pictures and videos, the 400GB SSD may be better suited. I like the idea of faster storage over more storage though.
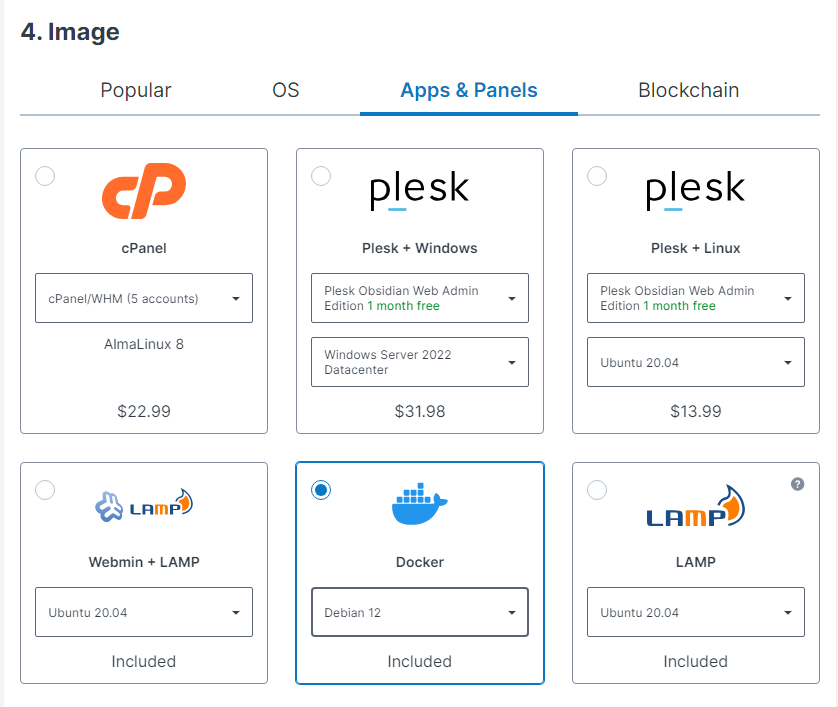
Your “Image” is which OS you want installed by default. We want Docker and I’m a fan of Debian, though Ubuntu is fine too. Choose the [Apps & Panels] tab and select [x] Docker. From the drop-down, choose “Debian 12”.
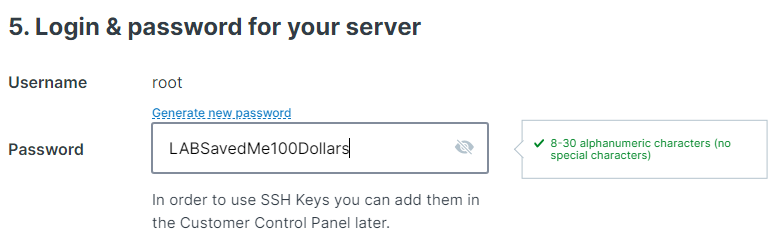
On Linux, your “Root” account is the default admin account that has Linux god powers. Give it a strong password because you don’t want anyone guessing this login!
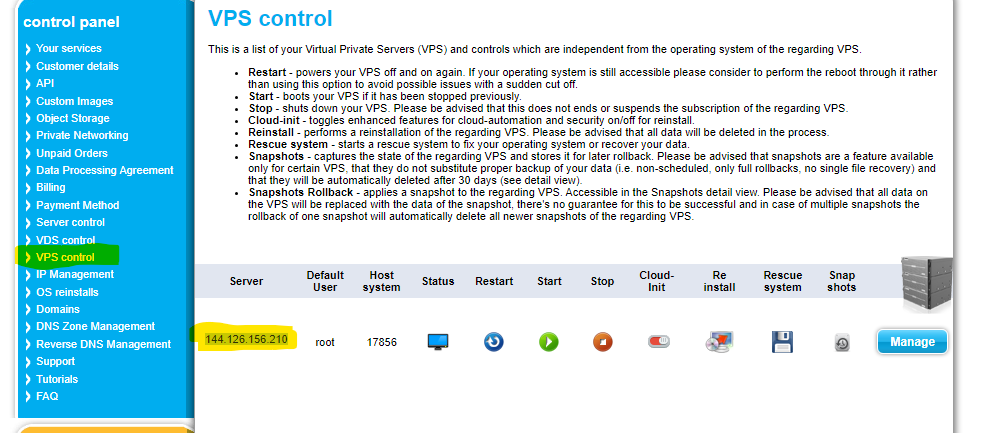
SSH into our new server
From the Contabo VPS control dashboard, we can find the IP to our server.
Windows PowerShell, Mac Terminal, and Linux Terminal all have SSH built-in now. From the command line, type “ssh root@123.123.123.123” replacing “123…” with the IP we copied from the Contabo dashboard.
When it asks, provide the password we set in the last step.
Create user accounts
While the “root” user is convenient, we should really create a non-root account to login with. Don’t worry… We can still give this new account elevated permissions too though. The second account we want is “asa” so we can attribute the file ownership. Using useradd, we can create our accounts with passwords. The basic useradd myUserName will create the account without a password and sets the default shell to /bin/sh. If you’ve already run that, don’t worry… We can fix that too.
useradd ben -s /bin/bash -p 5uper5ecretPa55w0rd
useradd asa
If you did something wrong here, we can still fix it. You may not even want your password shown in plain text like this. To change the password of my “ben” account, I’d use passwd ben. If you need to change the default shell, you can nano /etc/passwd and scroll to the bottom where your account is and change the default shell there.
We can now tail /etc/passwd -n2 to see those two new accounts and their IDs.
Most likely, our account with have a User ID and Group ID (UID:GID) of 1000:1000 and our “asa” account will have 1001:1001. The asa uid:gid will come into play later, so take note if they’re different than we expect.
Create Docker folder structure and install Dockge
There are several ways to setup your Docker directories, but I prefer to create new /opt/docker/ folder and nest everything under there. We can move into /opt and get started:
cd /opt
mkdir docker
cd docker
mkdir dockge dockge/data
And that’s it! Now we have a folder for Dockge and soon for our Ark server, and the data folder for Dockge. Next we’ll move into the Dockge folder and prepare a Docker Compose file. The Compose file is a simple way to deploy a new Docker container – or suite of containers – with a well-defined Yaml document.
cd dockge
nano compose.yaml
Nano is a simple text editor for Linux. We’re trying not to spend too much time on the Linux command line, but this will help us out. Bare with me – we’re almost there!
We can get the sample Compose file from the official Dockge repo, but that will need some updates specific to our environment. You’re certainly welcome to go that route, or you can use the Compose file I’ve already prepared:
version: "3.8"
services:
  dockge:
    image: louislam/dockge:1
    restart: unless-stopped
    ports:
      # Host Port : Container Port
      - 5001:5001
    volumes:
      - /var/run/docker.sock:/var/run/docker.sock
      - ./data:/app/data

      # If you want to use private registries, you need to share the auth file with Dockge:
      # - /root/.docker/:/root/.docker

      # Your stacks directory in the host (The paths inside container must be the same as the host)
      # ⚠️⚠️ If you did it wrong, your data could end up be written into a wrong path.
      # ✔️✔️✔️✔️ CORRECT: - /my-stacks:/my-stacks (Both paths match)
      # ❌❌❌❌ WRONG: - /docker:/my-stacks (Both paths do not match)
      - /opt/docker:/opt/docker
    environment:
      # Tell Dockge where is your stacks directory
      - DOCKGE_STACKS_DIR=/opt/docker
You should be able to copy this code and right-click into your SSH window to paste it in. If you’ve made any changes to your folder structure, be sure to update the compose file to match. And, that’s it!! Press [Ctrl] + 'x' to exit then 'y' to say you want to save and [Enter] to confirm the file name.
Finally (for Dockge), we need to deploy the new container. Type docker compose up -d and watch the Docker magic happen! It will download the images and build out the new install based on what we defined in the compose.yaml file!
Getting started with Dockge
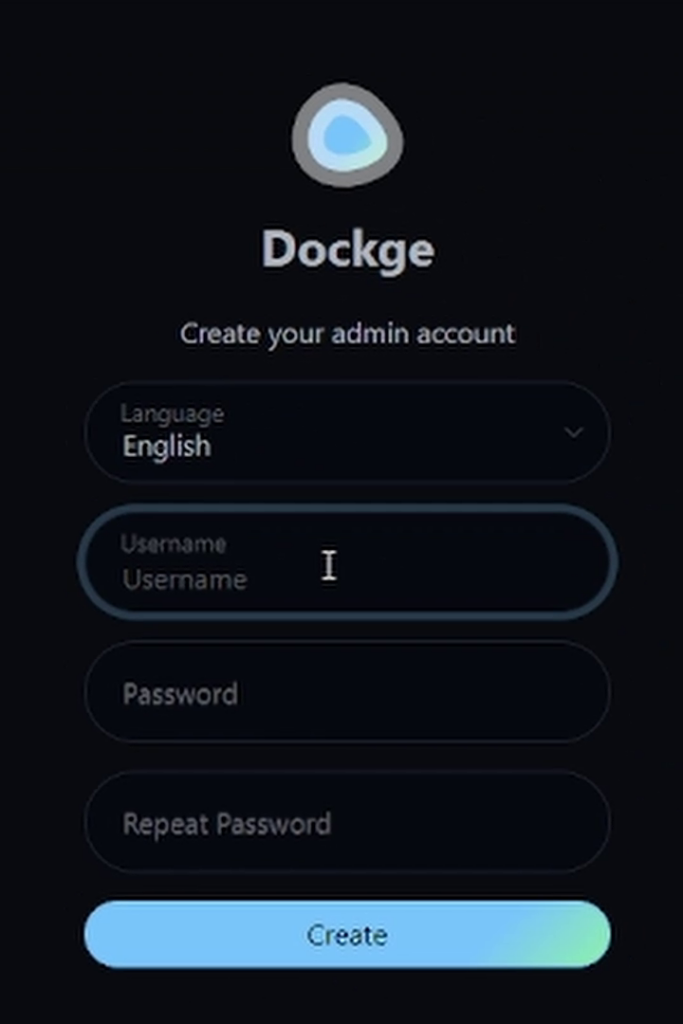
Alright! I think we’re mostly done with the command line. We may need to come back later, but my goal is to not keep you there more than we have to. Dockge is an easy way to graphically manage your Docker containers straight from the browser. It won’t do everything we need, but should be a gateway. If you noticed in the Compose.yaml file we created, we gave Dockge the default port 5001. All we need to do now is open that in the browser and specify port 5001: http:\\123.123.123.123:5001 – of course, replace the 123… with the IP of your server. The same IP we used to SSH in a few steps back. If we did everything right, we should be greeted with a page to create a new Dockge user:
Be sure to chose a strong password, since this is still open to everybody on the Internet – we should be able to fix that in another tutorial. I won’t go into too much detail here – the video shows it all much better. But you’re probably here for the asa compose file though:
Now, we’ve made a few changes to this since the video:
PUID / PGID were added as environment variables. These should correspond with the IDs for the ASA user we created.
MANUAL_CONFIG was updated in the video later, but we can include that now. It may be better to leave it out for your first run so the files will be created automatically.
Game.ini and GameUserSettings.ini we’ll need to go back and update in command line – for now.
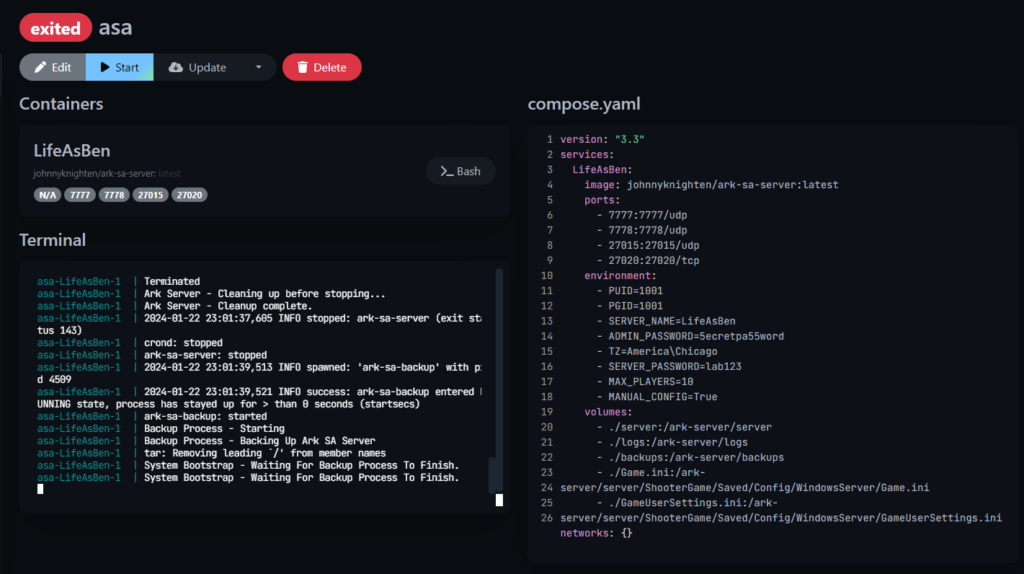
This Compose file can be pasted into the box on the right-side of Dockge, then press the blue [Start] on the left
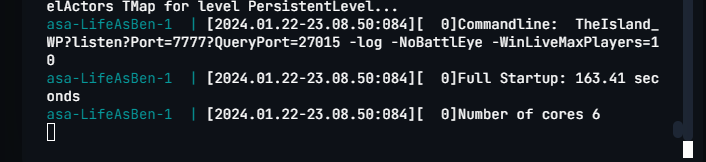
If this is the first time it starts, you’ll need to be patient. It may take several minutes to download the container images, then several minutes longer to start the server for the first time. It will need to update the SteamCmd executables, then download all of Ark:SA to your server. What you’re waiting for is the line that says something along the lines of “Full Startup 160 seconds”:
If there were no errors, you’re ready to test! I found that even though I specified “LifeAsBen” in the SERVER_NAME environment variable, it didn’t really respect that. Don’t panic if you can’t find your server though! We’ll update the INI files and that should get us started.
Updating INIs
Almost every aspect of Ark Servers is configured by the INI files: Game.ini and GameUserSettings.ini. I plan to do a detailed video about these in the future, but you probably want something to get started.
To edit these, we’ll need to go back to our SSH window. I won’t rehash that here, but we just need to SSH in (see above) and CD to the ASA folder:
cd /opt/docker/asa/
nano Game.ini
Game.ini we can do more with later, but for now we’ll just give it a placeholder:
[/script/shootergame.shootergamemode]
nano Game.ini and paste that in. [Ctrl]+'x' then 'y' to save and [Enter] to confirm.
Next we’ll nano GameUserSettings.ini
This one has a lot more options, so you’ll need to expand below for the sample. We don’t really need all of these, but it will get you started. I’ve also already changed some from the defaults, so it’s not quite “vanilla”. Be sure to update your server name (session name) and passwords in this file.
Again, paste that in then quite, and save: [Ctrl]+'x' then 'y' to save and [Enter] to confirm.
While we’re at the command line, there’s 1 more thing we should probably verify and that’s that our asa user owns all the files it should. From /opt/docker/asa, type in ls -la. The ‘LS’ command will list all files. The ‘-L’ flag tells it to give us a list showing permissions and owner info. The ‘A’ flag shows hidden files too. That ls -la should look something like this:
If your files or folders say they’re owned by root, we’ll need to fix that:
chown asa:asa *
That tells it to CHange OWNer to the user:group asa.
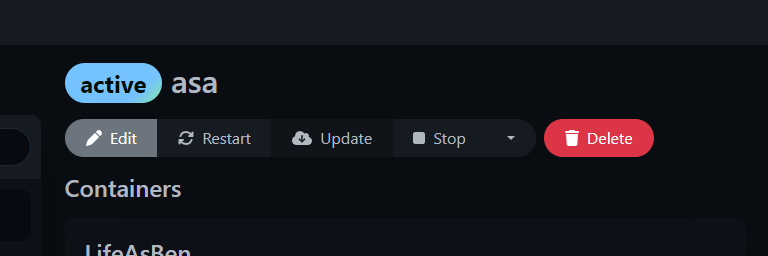
All that’s left is to restart the container back in Dockge:
Pressing the [Restart] button will force it to reload from our freshly-updated INI files.
Give it a few minutes to start back up, then check the game again. If you’re still having a hard time finding the server, make sure all your filter settings are set correctly: We don’t need to hide full; we need show show password protected servers since we have a password; this isn’t PC-only; and most importantly we want to show Player Servers.
One of my duties at Church is recording the service and posting that online later in the week. This means I spend a fair amount of time each week working with video and audio recordings. One of my favorite tools that can handle both is FFmpeg. As a command-line utility, FFmpeg is a no-fuss utility that just works as you tell it. However, this also means you could spend a lot of time making sure you type exactly what you want.
To assist with consistency, I’ve started using a series of Windows batch files that will make sure I’m using the same settings each time. This has become my favorite way to convert audio and video files.
Extract audio as wav.bat: This will extract the audio from any input file and convert it to .wav
Scale to 720p 29_97.bat: Most of the video files I work with are 1080p, 29.97 fps with high bitrates on audio and video. This script will change that to 720p with lower bitrates.
Extract AAC.bat: Like the .wav extract, this will extract the AAC. I use this to export the audio from videos I’ve compiled, so the script expects AAC format on the audio track of the video.
RunAllThroughBat.bat: On this one I pass in one of the other .bat files. So if I run this with “Extract AAC.bat”, it will find all the .mp4 videos in the current folder and extract the audio to .aac files.
Convert AVI to MP4.bat: Another that has a slightly unclear name. The source doesn’t have to be AVI, but that’s what I was using the script for at the time. I had recordings of several episodes from an old TV show. These recordings were made over a while and from different TV stations, so they lacked consistency. This converts them to MP4, normalizes the audio, and sets the movflag to fast start to make streaming better on Plex/Kodi. The script converts the file and moves it to my NAS where Plex picks it up.
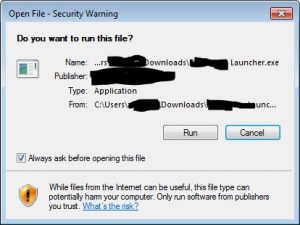
Anyone who has downloaded applications from the Internet has seen this warning:
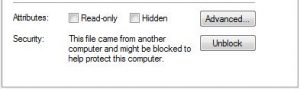
And many probably know you can go into properties and unblock that program:
However, it’s also possible to find and unblock those files in PowerShell. The “Unblock-File” command will unblock the application even if the [Unblock] button has been removed by Group Policy.
To find all the files in a folder that are blocked, you can use the
I recently realized that the backup job I’ve been creating hasn’t been properly deleting the files. Using this script I’m able to find all files in a folder (and it’s subfolders) so I can determine which files should be deleted. Since this is quicker to do on the remote server than my local machine, the last part is to copy the CSV to C:\Temp on my laptop. The date calls are just there as indicators of how long each step takes.
$today=$(Get-Date -Format u).Substring(0,10).replace("-","") date Get-ChildItem -Path "\\UNCServer\backup\directory\" -Recurse | Select-Object DirectoryName,BaseName, Extension, Length, CreationTime | Export-Csv -Path D:\Install\FileListing_$($today).csv date copy "D:\Install\FileListing_$($today).csv" "\\tsclient\C\Temp\" date
Part of any good backup plan is deleting the old backups you don’t need anymore. This PowerShell script will find all the full and tLog backups older than 31 days and delete them. Because this is meant to be run as a step in a SQL Agent job, PowerShell will default to a SQL Server context. Starting the script with CD C:will switch that to the file system. Without this line you may get an error that the path cannot be found.
It’s possible that you’d want to restore all the databases you have backed up to a specific folder. This will generate the scripts to restore those and move the files to a new destination. Copy the output from this query into a new query window and modify as needed before running.
Part of this code was taken from StackOverflow – I think this post in particular, but it’s hard to say for sure.
SET NOCOUNT ON
declare @folder as varchar(1000) = 'C:\Backups\ '
declare @moveToDrive as varchar(20) = 'M'
declare @allFiles as table(id int identity(1,1),file_nm varchar(200), depth_no int, is_file bit, fullPath varchar(1200)
,restoreFilenames varchar(2000))
DECLARE @fileListTable TABLE (
[LogicalName] NVARCHAR(128),
[PhysicalName] NVARCHAR(260),
[Type] CHAR(1),
[FileGroupName] NVARCHAR(128),
[Size] NUMERIC(20,0),
[MaxSize] NUMERIC(20,0),
[FileID] BIGINT,
[CreateLSN] NUMERIC(25,0),
[DropLSN] NUMERIC(25,0),
[UniqueID] UNIQUEIDENTIFIER,
[ReadOnlyLSN] NUMERIC(25,0),
[ReadWriteLSN] NUMERIC(25,0),
[BackupSizeInBytes] BIGINT,
[SourceBlockSize] INT,
[FileGroupID] INT,
[LogGroupGUID] UNIQUEIDENTIFIER,
[DifferentialBaseLSN] NUMERIC(25,0),
[DifferentialBaseGUID] UNIQUEIDENTIFIER,
[IsReadOnly] BIT,
[IsPresent] BIT,
[TDEThumbprint] VARBINARY(32) -- remove this column if using SQL 2005
,allFilesId int
)

insert into @allFiles (file_nm, depth_no, is_file)
EXEC Master.dbo.xp_DirTree @folder,1,1

update @allFiles set fullPath = @folder + file_nm
update @allFiles set restoreFilenames = 'RESTORE FILELISTONLY FROM DISK='''+fullPath+''''

--select id, file_nm, fullPath,restoreFilenames
--from @allFiles

DECLARE @curFile_id as int, @restoreScript as varchar(2000)
set @curFile_id = 1
while @curFile_id <= (select MAX(id) from @allFiles)
begin
select @restoreScript=restoreFilenames from @allFiles where id=@curFile_id
insert into @fileListTable ([LogicalName],[PhysicalName],[Type],[FileGroupName],[Size],[MaxSize],[FileID],[CreateLSN],[DropLSN],[UniqueID],[ReadOnlyLSN],[ReadWriteLSN],[BackupSizeInBytes],[SourceBlockSize],[FileGroupID],[LogGroupGUID],[DifferentialBaseLSN],[DifferentialBaseGUID],[IsReadOnly],[IsPresent],[TDEThumbprint])
exec(@restoreScript)
update @fileListTable set allFilesId=@curFile_id where allFilesId is null
set @curFile_id += 1
END

select allFilesId, LogicalName, @moveToDrive+SUBSTRING(PhysicalName,2,1000),
',MOVE '''+LogicalName+''' TO '''@moveToDrive+SUBSTRING(PhysicalName,2,1000)+''''
from @fileListTable
union
select id, '!'+SUBSTRING(file_nm, 1, PATINDEX('%_FULL%',file_nm)-1),'',
'RESTORE DATABASE ['+SUBSTRING(file_nm, 1, PATINDEX('%_FULL%',file_nm)-1)+'] FROM DISK='''+fullPath+''' WITH STATS=3,NORECOVERY'
from @allFiles
ORDER BY allFilesId, LogicalName


SET NOCOUNT OFF
Sometimes it’s necessary or nice to export all the databases and tables on a server. This simple script will give you information about every table you have access. As a DBA, you can uncomment the “execute as…” and “revert” lines to determine what tables another user can see.
-- execute as login = 'newUser'
set nocount on

Declare @Output as table (DBName varchar(200), TableName varchar(200), TAB_VIEW varchar(10), ColName varchar(200), ColType varchar(200), PK bit)
declare @DBName as VARCHAR(100) = 'master'
declare @SQL as NVARCHAR(max)
declare @CurDB as int = 5


while @CurDB <= (select MAX(database_id) from master.sys.databases)
begin
SELECT @DBName = name from master.sys.databases where database_id = @CurDB

begin try
print 'Checking ' + @DBName + '…'
SET @SQL = 'select "' + @DBName + "' as DBName, tables.name as TableName, tables.TAB_VIEW, columns.name as ColName,
case types.name
when "varchar" then "varchar(" + ISNULL(NULLIF(NULLIF(convert(varchar(4),columns.max_length) ,-1),0),"MAX") + ")"
when "char" then "char(" + ISNULL(NULLIF(NULLIF(convert(varchar(4),columns.max_length) ,-1),0),"MAX") + ")"
when "nvarchar" then "nvarchar(" + ISNULL(NULLIF(NULLIF(convert(varchar(4),columns.max_length/2),-1),0),"MAX") + ")"
when "nchar" then "nchar(" + ISNULL(NULLIF(NULLIF(convert(varchar(4),columns.max_length/2),-1),0),"MAX") + ")"
when "binary" then "binary(" + ISNULL(NULLIF(NULLIF(convert(varchar(4),columns.max_length) ,-1),0),"MAX") + ")"
when "varbinary" then "varbinary(" + ISNULL(NULLIF(NULLIF(convert(varchar(4),columns.max_length) ,-1),0),"MAX") + ")"

when "numeric" then "numeric(" + convert(varchar(4),columns.precision) + "," + convert(varchar(4),columns.scale) + ")"
when "decimal" then "decimal(" + convert(varchar(4),columns.precision) + "," + convert(varchar(4),columns.scale) + ")"

when "float" then "float" + ISNULL(NULLIF("("+convert(varchar(4),columns.precision)+")","(53)"),"")
–when "varbinary" then "varbinary(" + ISNULL(NULLIF(NULLIF(convert(varchar(4),columns.max_length) ,-1),0),"MAX") + ")"
else types.name end as ColType–, columns.*
,isnull(PK.[PrimaryKey],0) as [PrimaryKey]

from [' + @DBName + '].sys.columns
inner join (SELECT NAME, object_id, is_ms_shipped, "TABLE" AS TAB_VIEW FROM [' + @DBName + '].sys.tables
union SELECT NAME, object_id, is_ms_shipped, "VIEW" AS TAB_VIEW FROM [' + @DBName + '].sys.views ) as tables
on tables.object_id = columns.object_id
left join [' + @DBName + '].sys.types
on types.user_type_id = columns.user_type_id
outer apply (
select case when si.object_id is not null then 1 else 0 end as [PrimaryKey]
from [' + @DBName + '].sys.indexes si
inner join [' + @DBName + '].sys.index_columns ic
ON si.OBJECT_ID = ic.OBJECT_ID
AND si.index_id = ic.index_id
and si.is_primary_key = 1
where si.object_id = tables.object_id
and ic.column_id = columns.column_id
) as PK

where tables.is_ms_shipped = 0'

insert @Output
exec sp_sqlexec @SQL
print '... Success'
end try
begin catch
print '... Error: ' + error_message()
end catch

set @CurDB += 1
end

select * from @Output

print 'COMPLETE!'
-- revert